|
In my moves I missed the fact that my idol released a new cookbook! Now that I'm settled I finally have time to digest this one. So many others popped up with these types of vegan meat recipes that I try and am usually disappointed by. Isa is my OG Vegan and has never let me down so I had very high hopes and the first recipe I happen to try was fun to make and of course delicious! My husband was skeptical as these steamed but ended up getting seconds. This is definitely in our home's permanent rotation.
1. In a food processor fitted with a metal blade, puree the tofu, ketchup, broth, olive oil, and soy sauce until completely smooth, scraping down the sides with a rubble spatula to make sure you get everything.
2. In a large bowl, mix together the vital wheat gluten, nutritional yeast, smoked paprika, onion powder, garlic powder, salt and white pepper. Make a well in the center and add the tofu mixture. Use the rubber spatula to mix until well combined, and then use your hands to further knead the mixture until it's a well-formed dough with a little spring to it. 3. Prepare your steaming apparatus. Have ready eight 10" squares of parchment and 8 10" sheets of aluminum foil. 4. Divide the dough into 8 equal pieces. Roll each piece into a hot dog shape. Place a dog at the bottom of a square of parchment and roll it up. Then place it in a piece of foil and roll it up, this time, tightly sealing the ends like a tootsie roll. Repeat with the remaining dogs. 5. Steam the hot dogs for about 40 minutes, until very firm. Let them cool completely before unwrapping. Then preheat a grill pan over medium high. Unwrap the cooled dogs and grill for about 3 minutes, turning them once, until grill marks appear.
0 Comments
Vegan Beef Broth Concentrate
The Herbivorous Butcher by Aubrey & Kale Walch 2 cups soy sauce 1/2 cup apple cider vinegar 1/2 cup sunflower oil 2 cups nutritional yeast 1/2 cup onion powder 1/2 cup garlic powder 1/4 cup ground ginger 2 tablespoons black pepper, freshly ground 1. In a food processor or blender, combine the soy sauce, vinegar, oil, nutritional yeast, onion powder, ginger and pepper. 2. Blend until smooth, making sure to scrape down the sides of the bowl with a rubber spatula for even distribution. 3. Store the broth concentrate in an airtight container in the refrigerator and use within 3-4 weeks for best results. Additional broth concentrate can also be frozen and used within a year. 12/29/2023 0 Comments The Herbivorous Cookbook's Vegan Ribs
The Vegan Rib
The Herbivorous Butcher by Aubrey & Kale Walch DRY MIXTURE = 13 ounces vital wheat gluten 20 grams nutritional yeast 2 tablespoons chickpea flour 1 tablespoon all purpose flour 2 tablespoons granulated garlic 2 tablespoons onion powder 1 tablespoon paprika 1 tablespoon salt WET MIXTURE = 1 3/4 cups apple juice 1/2 cup water 1/4 cup soy sauce 2 tablespoons liquid smoke 3 tablespoons brown sugar 2 tablespoons vegetable oil, for searing BRAISING BROTH = 1/2 cup VEGAN BEEF BROTH CONCENTRATE recipe 5 cups water 1. Preheat oven to 325. Grease a 9x13" baking dish. 2. TO MAKE THE DRY MIXTURE = In a large bowl, add the gluten, nutritional yeast, chickpea flour, all purpose flour, granulated garlic, onion powder, paprika and salt. Stir well to combine. 3. TO MAKE THE WET MIXTURE = In a separate large bowl, add the apple juice, water, soy sauce, liquid smooth, and brown sugar. Whisk well to combine. 4. Slowly stir the wet mixture into the dry mixture. As the dough thickens, knead it by hand by placing it on a lightly floured surface and pressing it with the heel of the hand in a forward pulling motion. Rotate the dough and repeat for 1-2 minutes until no dry spots remain. 5. Transfer the dough to a large cutting board or clean surface. With a rolling pin, roll out the dough into a flat rectangle, about 4-5" long rib shaped pieces and set aside. 6. In a skillet or small saute pan over medium-high heat, add the oil. Once heated, add the ribs and sear until they're golden brown, but not burnt, on both sides. 7. TO MAKE THE BROTH = In a small bowl, whisk together the beef broth concentrate and water. 8. Arrange your ribs in a single layer in the prepared baking dish, then pour on the braising broth (or chosen sauce), ensuring each one is almost completely covered. Cover the dish with foil and bake for 1 hour. Check to see if each piece is firm; add another 10 minutes if needed. Remove from the pan, store in an airtight container and enjoy within a week. 12/29/2023 0 Comments Soup Sisters Sweet Potato & Corn Soup

Sweet Potato & Corn Soup
The Soup Sisters Cookbook, 2012 by Sharon Hapton 1 onion, diced 1 sweet red pepper, seeded and diced 2 tablespoons olive oil 2 cloves garlic, minced 1 small hot red chili pepper, seeded and diced 2 teaspoons ground cumin 2 cups fresh corn kernels 1 sweet potato, peeled and diced 8 cups vegetable stock salt and pepper, to taste 1 lime, cut into wedges 1. In a large pot over medium heat, saute the onion and red pepper in the oil, until the onion is softened. 2. Stir in the garlic, chile and cumin. Stir in the corn and sweet potato. 3. Add the stock. Bring to a boil over high heat, then reduce the heat to medium-low. 4. Simmer, uncovered, until the sweet potatoes and corn are tender, about 25 minutes. 5. Puree half the soup until smooth. Return the pureed soup to the pot. Reheat over medium heat and add salt and pepper to taste. 6. Ladle up a steamy, chunky bowl of sweet soup, and squeeze over a fresh and zesty lime wedge. 3/6/2022 1 Comment honey & oats GF Oatmeal Cookies
Oatmeal Cookies
"honey & oats - everday favorites baked with whole grains and natural sweeteners" Jennifer Katzinger These fiber-filled oatmeal cookies are full of juicy raisins and toasty walnuts, intermingling with a touch of buckwheat flour. The little bit of orange zest adds vibrancy. Look for certified gluten-free oats, which are now available at most grocery stores. You can make your own oat flour by pulverizing oats in a food processor or blender. 1/2 cup unsalted butter, at room temperature 1/2 cup maple syrup 1 1/2 tablespoons coconut sugar 1 large egg 1 teaspoon vanilla extract 3/4 cup rolled oats 3/4 cup oat flour 1/2 cup buckwheat flour 1/2 cup flaxseed meal 1/2 teaspoon baking soda 1/2 teaspoon baking powder 1/4 teaspoon ground cinnamon 1/4 teaspoon coarse salt 3/4 cup raisins 1/2 cup chopped walnuts, toasted 1/2 teaspoon orange zest 1. Preheat the oven to 350 degrees F and line 2 baking sheets with parchment paper. 2. In a large bowl using an electric mixer, or in the bowl of a stand mixer fitted with the paddle attachment, beat the butter, maple syrup, and coconut sugar until light and fluffy, about 5 minutes. With the mixer on medium speed, mix in the egg and vanilla. In a separate bowl, combine the oats, flour, flaxseed meal, baking soda, baking powder, cinnamon and salt. With the mixer on low speed, gradually add the dry ingredients, mixing until just combined. Fold in the raisins, walnuts, and zest. 3. Using the palms of your hands, roll the dough into 1 1/2" balls. Place them on the prepared baking sheets, spacing them 2" apart. Flatten slightly with the palm of your hand. Bake until golden, 13-15 minutes. Cool the cookies on the sheets on wire racks for 5 minutes, then transfer to racks or flattened paper bags to cool completely. 
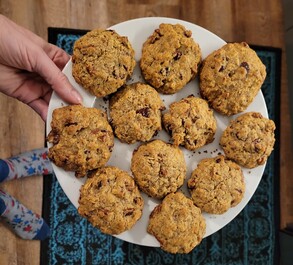
I love fall and PUMPKIN season! This year I wasn't able to grow any pumpkins myself but I did make it to a great local farm with be near our place with beautiful pie pumpkins. We got 3 little guys so my husband could have his yearly pumpkin pie fix but after that I still had some leftover pumpkin... such a problem!
My pumpkin inspiration was lacking so I wandered the local library and this cute little book jumped out at me. Of course I headed to the dessert chapters and found an excellent solution to use up the rest of my pumpkin. The recipe calls for canned pumpkin but fresh roasted pumpkin worked well. This had some kind of nutty taste that boggled the mind as there are no nuts in here. These will definitely be in the seasonal rotation; easy to make but so good! 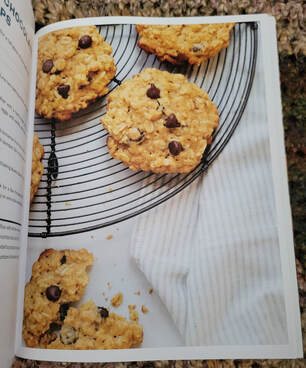
Oatmeal-Chocolate Crisps
"The Pumpkin Cookbook" by Deedee Stovel 1 cup brown sugar 3/4 cup sugar 1 cup unsalted butter, softened 1/2 cup pumpkin puree 2 eggs 1 teaspoon vanilla extract 1 1/2 cups unbleached all-purpose flour 1 teaspoon baking powder 1 teaspoon salt 1/2 teaspoon ground cinnamon 3 cups rolled oats 1 1/2 cups semisweet chocolate chips 1. Heat the oven to 350 degrees. Line two baking sheets with parchment paper. 2. Beat the sugars and butters together with a hand mixer until well blended and fluffy. Add the pumpkin, eggs, and vanilla and beat until smooth. 3. Sift the flour, baking powder, salt, and cinnamon into the mixture and continue beating at low speed until well blended. Stir in the oats and chocolate chips. 4. Drop by tablespoons onto the prepared baking sheets. Bake for 12 to 15 minutes, or until lightly browned. 5. Cool each baking sheet on a wire rack for a few minutes before removing the cookies. Cool them completely on wire racks and store in an airtight container. Enjoy! Yield: 8 dozen Notes: Variation: If available, substitute some of the flour with whole-wheat pastry flour. This is a low-gluten flour that adds nutrition but not the heaviness of whole-wheat bread flour. It is a wonderful product to use in pastries and baked goods where you want the nutrition of whole wheat, but not the heaviness.
5/15/2021 0 Comments Easy Italian Dinner Night!
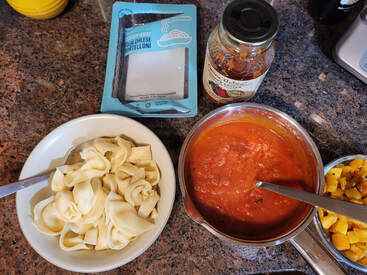
I love Italian food but can't always put in the effort... yes, we always make our own sauce. Chopping veggies, simmering on the stove for hours and puree it up! And sometimes, yes, we even make the pasta. Lately we've been looking to alternative grains and gluten free options, which we have not had much success with making from scratch. 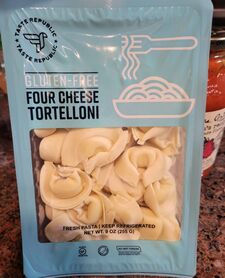
On a trip to Whole Foods we skeptically decided to try some ready made options. Taste Republic pasta in the refrigerated section caught our eye. Being from Wisconsin we tried the cheese tortellini. It's gluten free, made with a blend of brown rice flour and tapioca. Most of those gluten free pastas we've tried we've struggled to make successfully. This tortillini we followed the instructions and it cooked up perfectly. It had a great texture and taste, not gummy or soggy like many other GF pastas. This was very close in taste to a handmade conventional pasta. Next time, we will try the other varieties - they have fettuccini, linguini, vegetable based doughs, and even chickpea/lentil doughs! In looking to learn more about this company that makes this good stuff I was excited to see it's made by RP Pasta who we used to buy from at the Farmer's Market in Madison, Wisconsin. It's great to see a small company grow nationwide. Now that I'm in North Carolina I can enjoy a treat from back home. Website currently has $1 coupon towards the pasta - check it out here!
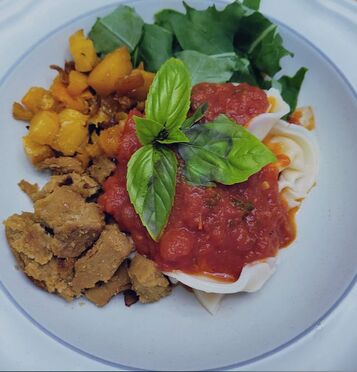
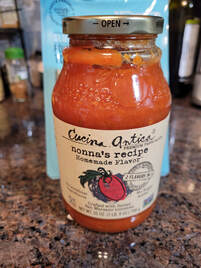
For sauce we went with Cucina Antica, tomato basil. When we make our own sauce we always use San Marzano tomatoes. We were drawn to this as they do as well. All of the ingredients I recognize, no strange fillers - all legit vegetables and spices in there, just like we'd make at home. The taste was of fresh tomato flavor. I like seeing the garlic and basil pulsed together with tomatoes. I just put it in a saucepan and heated it up. In a few minutes I had something like I'd be simmering away all day to make. So easy and delicious! I looked into getting more on the regular and am happy to see it's on amazon!!
To complete the meal, I roasted some ready cut butternut squash and grabbed some kale and spinach from the garden to toss in a raw handful. We added some protein and topped with basil from the garden. Such an easy fancy dinner that we look forward to repeating again!
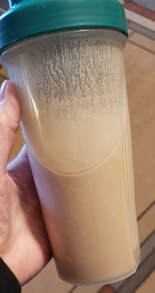
4/4/2021 1 Comment Great Greens Smoothie This is a blast from the past that I read in a Self Magazine diet plan. I do like a green drink, and this one is an easy option. The addition of orange juice is nice; I use fresh or just throw in fresh orange slices. When I'm out of protein powder I like recipes like this that help fill me up with simple add ins, like flax seeds. Great Greens Smoothie
Self Magazine, April 2011 1 1/2 cups soy milk 1 cup spinach 1/2 banana 2 1/2 tablespoons flax seed 1/4 cup orange juice 1 teaspoon vanilla extract Blend until smooth. Note: To make bigger, use 2 cups soy milk and 1 full banana.

White Arnold
"Wise Cocktails" by Jennie Ripps & Maria Littlefield Makes 1 Cocktail TEA BASE 1 teaspoon white tea leaves 1/2 teaspoon rose petals 1/2 teaspoon dried strawberries 1 pinch dried lemon peel COCKTAIL 4 1/2 ounces brewed tea base 1 1/2 ounces vodka 1 tablespoon agave nectar GARNISH 1 slice lemon 1. In a cup, place 6 ounces of room temperature water. You will only use 4 1/2 oz for the tea base in this recipe, so don't worry if there is extra left over. Feel free to sip, save or discard! 2. In a tea linen or tea ball, combine all of the ingredients for the tea base. Brew in the room temperature water for 10 minutes, agitating from time to time. Remove the sachet/ball. 3. In a shaker, combine 4 1/2 oz of the tea base, the vodka, and agave nectar. Dry-shake until the agave dissolves. Pour into a glass over ice. Gently swirl to chill. Garnish with the lemon slice. Notes: White tea is complimented by clarifying and energizing lemon peel. Strawberries and rose petals add a boost of vitamin C. *For a strawberry punch: Add 2 fresh strawberries to the shaker and muddle. Then add the tea base, vodka, and agave, and dry-shake. Serve over ice. 2/18/2021 0 Comments Banana Chocolate Shake
Banana Chocolate Shake
2 cups water 2 tablespoons almond butter 1 tablespoon honey 1 tablespoon cacao 1/4 teaspoon almond extract 1/4 teaspoon vanilla extract 1 sprinkle cinnamon 1/4 cup walnuts 3 bananas, frozen Combine all ingredients in blender and blend until smooth. |
Jen's Kitchen...is the smallest kitchen ever. We used to watch those decorating shows that said they were doing small kitchens and then could see that 4 of my kitchens would fit in their "small kitchens". 
Archives
March 2022
CategoriesAll Air Fryer Almonds Apple Asparagus Avocado Bagel Banana Bar Bark Bars Basil Beans Beer Beets Black Beans Blueberries Braise Brandy Bread Breakfast Brewers Organics Broccoli Brown Sugar Bruschetta Brussel Sprouts Burger Cabbage Cacao Cake Candy Carrot Cashews Cauliflower Celery Salt Cheddar Cheese Cherry Cherry Tomatoes Chicken Chickpeas Chips Chocolate Clock Shadow Creamery Cocktail Cocoa Coconut Coconut Flour Coconut Sugar Coffee Cookies Corn Cranberries Cream Cucumber Cupcake Dates Dinner Dip Dried Fruit Drink Easy Edamame Eggs Empanadas Farro Fermentation Feta Food Fries Fudge Gluten Free Grapefruit Gravy Greek Yogurt Green Tomatoes Growing Power Hazelnut Herb Home Made Honey ISi Jar Kale Lavender Lemon Lentils Malt Maple Martha Stewart Microwave Mint Mushrooms Nutritional Yeast Oatmeal Oats Omanhene Orange Organicville Paprika Parmesan Parsnip Pasta Peanut Peanut Butter Peas Pepper Pesto Pickles Pie Pineapple Pita Pizza Potato Pretzels Pudding Pumpkin Quiche Quinoa Raisins Raspberry Rice Risotto Roast Rose Salad Salt Sandwich Siracha Slaw Slow Cooker Smoothie Soup Sous Vide Spinach Squash Strawberries Strawberry Sugar River Dairy Sunflower Sushi Sweet Potato Tacos Tamari Tea The Engine No 2 Diet The Food Lab The Spice House Tofu Tomato Tortellini Trader Joe's Trail Mix Trends Truffles Vanilla Vegan Vegetarian Vodka Walnuts Wisconsin Winter Farmer Zombie Zucchini |


 RSS Feed